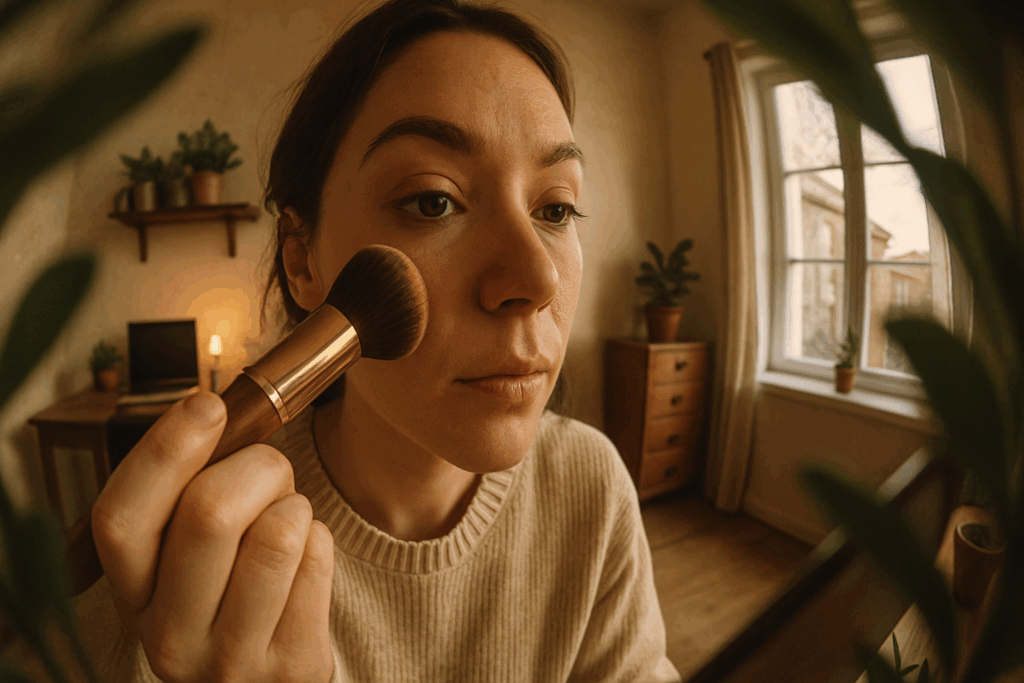
What Underpainting Actually Is
Underpainting flips the usual routine. Instead of layering everything on top of foundation, you start underneath it. Before any base hits your skin, you’re laying down contour, blusher, concealer, and highlighter right where they’re needed. Think of it as sculpting first then lightly veiling it with foundation, not burying it.
The goal here isn’t coverage. It’s dimension. Smart shadows, subtle lifts, and that real skin effect that moves with your face instead of sitting flat on top. Done right, underpainting gives you a finished look that’s polished without being heavy. Just your features, enhanced not erased.
Why It Works
Underpainting isn’t about piling on makeup it’s about using less to do more. By layering contour, blush, and highlight before your foundation, you shape the face without harsh lines or excess product. The result is definition that feels natural, not drawn on. Think soft shadows, not streaks.
Because you’re starting with sculpting tones and adding only a sheer layer of foundation on top, the finish stays light. Skin still looks like skin. You’re not covering you’re revealing, just strategically. That means no cakey buildup, no heavy coverage that flattens your features.
This technique speaks directly to skin first beauty lovers and minimalists. It plays well with real texture, doesn’t fight pores or fine lines, and holds up in natural light. If you’ve ever wanted your makeup to look invisible but still pull weight this is your move.
Step by Step: Underpainting in Action
Mastering underpainting is all about layering with intention. Here’s a step by step guide to creating natural looking dimension without overloading your skin.
Prep with Skincare & Primer
Start with clean, hydrated skin.
Apply your regular skincare routine (moisturizer, SPF, etc.)
Follow with a luminous primer to boost glow and help products blend more smoothly
Cream Contour Placement
Before foundation, sculpt your features using a cream contour stick or palette.
Apply to the underside of cheekbones to create shadow
Carve out the jawline and blend well to avoid harsh lines
Add subtle contours to both sides of the nose for definition
Add a Natural Flush
Blush comes next and it goes higher than you might think.
Place blush high on the outer cheekbones to lift the face
Sweep a touch across the bridge of your nose for a sun kissed effect
Highlight with Restraint
Use a cream or liquid highlighter to bring out your natural radiance.
Focus on the tops of cheekbones, center of the forehead, and chin
Lightly dab and blend to avoid shimmer buildup
Concealer for Lift and Light
Lighten and brighten where needed with strategic concealer placement.
Target inner and outer corners of the eyes for a subtle lifting effect
T zone and chin can be brightened for balance
Need tips? Check out these concealer placement strategies
Finish with a Sheer Foundation Layer
This final step pulls everything together.
Choose a lightweight or serum like foundation
Use a sponge or buffing brush to gently blend over pre placed creams
The goal: a unified, dimensional finish not a full coverage mask
Take your time blending each layer before moving to the next. Underpainting rewards patience and precision for a skin like, radiant result.
Product Best Practices
When it comes to underpainting, cream products are the clear winner. Powders tend to sit on the surface fine for a set it and forget it look, but not great if you want seamless blending. Creams melt into the skin, making it easier to sculpt, adjust, and layer without harsh lines.
Tools matter. Fingers can work in a pinch, but for real control, grab a dense brush or a damp sponge. These help keep product exactly where you want it especially key when you’re working under foundation. This isn’t the time to slap it on and hope for the best.
Patience pays off. Blend each layer fully before moving on to the next. Coloring outside the lines with blush or leaving a harsh contour mark? It shows. One layer at a time, fluid movements, light hands. Think painter, not plasterer.
Who Underpainting Works Best For
Underpainting isn’t about perfection it’s about skin that looks real, but better. If you’ve got texture, dry spots, or fine lines, this technique plays to your strengths. Cream based products used underneath foundation sink in rather than sit on top, helping the finish stay smooth instead of flaky. It’s also a go to for mature skin because it avoids anything too heavy that can settle into creases.
For those who want a natural glow without a full beat, underpainting delivers. Your features get sculpted without screaming “contour,” and the overall vibe is polished but unfussy. Think: a subtle radiance that still lets freckles, pores, and real skin show through.
Bonus points? It’s made for real life lighting. No flashback, no weird patches under sunlight, just soft dimension that holds up whether you’re on camera or grabbing coffee. This is minimal effort, maximum payoff kind of makeup.
Common Mistakes to Avoid
Underpainting isn’t complicated, but it’s easy to mess up if you get heavy handed or rush the process. First off, watch the amount of foundation you use at the end. The whole point of underpainting is subtle dimension, not erasing all your careful work under a thick layer. A light, sheer foundation should pull it all together not bury it.
Next, don’t skip the blend. It sounds basic, but harsh lines from contour, blush, or highlight kill the natural vibe. Each product needs to melt into the next. Buff them out with patience. You want shadows, not stripes.
And if you think any concealer placement works, think again. Put it too low or too wide and instead of lifting your features, you’re dragging them down. For more on that, dive into these concealer placement tips. Being precise here makes all the difference.
The Final Look
Underpainting doesn’t shout. It enhances. When done right, your skin still looks like skin only more awake, sculpted, and naturally radiant. You’re not burying your features under foundation; you’re letting them breathe and catch the light in the right places.
The finished effect is dimensional but wearable. Think subtle shadows where you want depth, softness where you want lift, and a finish that looks like you slept well and drank your water. It’s not about chasing glam it’s about dialing into your natural structure and giving it a bit of quiet elevation.
For vloggers, makeup artists, and everyday wearers alike, it means less product, more payoff. And in today’s high def world, when everything is just a zoom call or 4K upload away, breathable beauty wins.
 Irmaneliah Dunlp has opinions about trend tracker. Informed ones, backed by real experience — but opinions nonetheless, and they doesn't try to disguise them as neutral observation. They thinks a lot of what gets written about Trend Tracker, Expert Breakdowns, Skincare Routine Innovations is either too cautious to be useful or too confident to be credible, and they's work tends to sit deliberately in the space between those two failure modes.
Reading Irmaneliah's pieces, you get the sense of someone who has thought about this stuff seriously and arrived at actual conclusions — not just collected a range of perspectives and declined to pick one. That can be uncomfortable when they lands on something you disagree with. It's also why the writing is worth engaging with. Irmaneliah isn't interested in telling people what they want to hear. They is interested in telling them what they actually thinks, with enough reasoning behind it that you can push back if you want to. That kind of intellectual honesty is rarer than it should be.
What Irmaneliah is best at is the moment when a familiar topic reveals something unexpected — when the conventional wisdom turns out to be slightly off, or when a small shift in framing changes everything. They finds those moments consistently, which is why they's work tends to generate real discussion rather than just passive agreement.
Irmaneliah Dunlp has opinions about trend tracker. Informed ones, backed by real experience — but opinions nonetheless, and they doesn't try to disguise them as neutral observation. They thinks a lot of what gets written about Trend Tracker, Expert Breakdowns, Skincare Routine Innovations is either too cautious to be useful or too confident to be credible, and they's work tends to sit deliberately in the space between those two failure modes.
Reading Irmaneliah's pieces, you get the sense of someone who has thought about this stuff seriously and arrived at actual conclusions — not just collected a range of perspectives and declined to pick one. That can be uncomfortable when they lands on something you disagree with. It's also why the writing is worth engaging with. Irmaneliah isn't interested in telling people what they want to hear. They is interested in telling them what they actually thinks, with enough reasoning behind it that you can push back if you want to. That kind of intellectual honesty is rarer than it should be.
What Irmaneliah is best at is the moment when a familiar topic reveals something unexpected — when the conventional wisdom turns out to be slightly off, or when a small shift in framing changes everything. They finds those moments consistently, which is why they's work tends to generate real discussion rather than just passive agreement.